Here is the link to a new approach in learning languages - www.effortlessenglishclub.com
The method is based on the idea, supported by following research, that adults have difficulties in learning second languages not because they lost some talent, which children still possess, but because they learn it in a wrong way, what children cannot do. That is why when the family moved to another country, children soon speak the new language fluently, while their parents after many years may still have serious difficulties.
Now I am trying to learn English following seven rules. Let's see if it helps.
Monday, 15 June 2009
Friday, 1 May 2009
Gnome Debian Package Finder 0.1.8 released
Recently a new version of Gnome Debian Package Finder became available to the public. This program is positioned for people either new to Linux or those who came with Windows experience and used to work with Graphical User Interface rather than type commands in the terminal.
There is a big difference between Windows and Linux on how software is distributed. Searching in the Internet and downloading from unknown web-sites, as Windows users used to do, is not suggested for Linux users, because most of the software can be found in the official repositories. So if one wants to find a music player for example, it is better to check what is available from the repositories first. That is where Gnome Debian Package Finder can help.
The major improvements comparing with the first release are:

To my surprise when I googled for "Debian Package Finder" I found this article about my program at Linux.com. The review outlines some problems with user interface, which I hope I will fix in future releases, and also shows one my obvious mistake: I had never mentioned anywhere that the program window had two horizontal splitters, so this feature remained un-noticed. As for its functionality I don't target package maintainers or Linux geeks as its primary users, so some features of command-line programs, like search for maintainers, will likely never been implemented.
The program is still in its beta stage and available for downloading from
GTK_APPS.ORG
Softpedia.com
There is a big difference between Windows and Linux on how software is distributed. Searching in the Internet and downloading from unknown web-sites, as Windows users used to do, is not suggested for Linux users, because most of the software can be found in the official repositories. So if one wants to find a music player for example, it is better to check what is available from the repositories first. That is where Gnome Debian Package Finder can help.
The major improvements comparing with the first release are:
- changed window layout to better fit small screens of netbooks (I tested it on my Asus EEE PC 701 with 800 x 480 screen resolution)
- more functionality available via right-click popup menus
- drag-and-drop facility

To my surprise when I googled for "Debian Package Finder" I found this article about my program at Linux.com. The review outlines some problems with user interface, which I hope I will fix in future releases, and also shows one my obvious mistake: I had never mentioned anywhere that the program window had two horizontal splitters, so this feature remained un-noticed. As for its functionality I don't target package maintainers or Linux geeks as its primary users, so some features of command-line programs, like search for maintainers, will likely never been implemented.
The program is still in its beta stage and available for downloading from
GTK_APPS.ORG
Softpedia.com
Tuesday, 14 April 2009
Advanced Tone-mapping with GIMP
Most compact photo-cameras cannot handle contrast scenes properly. Here a plugin for GIMP (GNU Image Manipulation Program - a popular open-source alternative for PhotoShop, available for Windows, Linux and Mac OS), called Advanced Tone Mapping comes to the rescue. The script processes a single image, unlike High Dynamic Range technique, which requires at least two shots, increasing its local contrast and reducing total one. In a plain language it makes dark parts of the image lighter and bright parts darker. Obviously, the picture should not be overexposed, because nothing can get any information from the white sky, as it is completely lost.
Let start with the example.
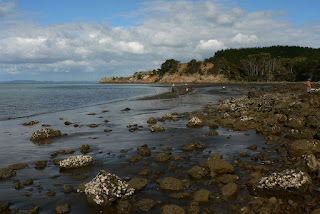
I took this photo at South Head, the Kaipara Harbour entrance, not far from Auckland, New Zealand. In order to preserve the sky I set up exposure compensation to -2/3, so the whole picture became too dark. The sand is dark indeed, as it contains black volcanic ash, but pieces of broken sandstone on the foreground should be same colour like the background cliff.
One disadvantage of the script is that it takes a while to process a picture and there is no preview available, so nobody can tell you what values should be set as the parameters (four ones in total). Thus the idea of the explained technique is to over-process the picture, then to reduce the effect to get the desired result. So I opened the picture in GIMP, clicked Filters - Enchance - Advanced Tone Mapping and set the parameters as follows:
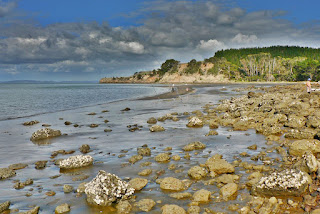
I definitely got what I wanted, but the result is far from ideal. The colours are un-real, and halos are strong and clearly visible. This new image appeared as a second layer above the original image, and this is very handy, as what I have to do now is just to change some parameters of this new layer.
So I switched to the Channels, Paths, Undo, Layers - ... dialog and selected Layers tab. The new layer is called tmapd: with some numbers, it should be already selected. I changed the layer mode to Value (the last in the list) and adjusted its opacity until I considered the result as satisfactory; the final opacity value for this image was about 60%. This is the interactive process and the changes are reflected on the image (almost :) immediately.
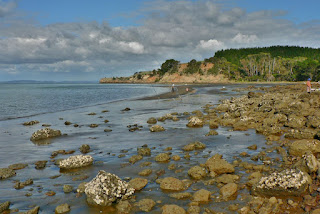
As you can see the clouds became more impressive, the background is now brighter; there is still some halo above the forest, but it is not so obvious.
This technique increases the noise level, especially in brighter parts of the image. This is because they contain less information, higher local contrast means small variations of brightness becomes more visible; it usually affects the blue sky. One can try to improve this by applying another plugin - GREYCstoration to the resulting and flattened image.
Let start with the example.

I took this photo at South Head, the Kaipara Harbour entrance, not far from Auckland, New Zealand. In order to preserve the sky I set up exposure compensation to -2/3, so the whole picture became too dark. The sand is dark indeed, as it contains black volcanic ash, but pieces of broken sandstone on the foreground should be same colour like the background cliff.
One disadvantage of the script is that it takes a while to process a picture and there is no preview available, so nobody can tell you what values should be set as the parameters (four ones in total). Thus the idea of the explained technique is to over-process the picture, then to reduce the effect to get the desired result. So I opened the picture in GIMP, clicked Filters - Enchance - Advanced Tone Mapping and set the parameters as follows:
- Gauss. Blur: 10% - the default value
- Opacity of blurred layer - 100 or near
- Opacity of merged layer - 100 or near
- Copies of merged layer - 3

I definitely got what I wanted, but the result is far from ideal. The colours are un-real, and halos are strong and clearly visible. This new image appeared as a second layer above the original image, and this is very handy, as what I have to do now is just to change some parameters of this new layer.
So I switched to the Channels, Paths, Undo, Layers - ... dialog and selected Layers tab. The new layer is called tmapd: with some numbers, it should be already selected. I changed the layer mode to Value (the last in the list) and adjusted its opacity until I considered the result as satisfactory; the final opacity value for this image was about 60%. This is the interactive process and the changes are reflected on the image (almost :) immediately.

As you can see the clouds became more impressive, the background is now brighter; there is still some halo above the forest, but it is not so obvious.
This technique increases the noise level, especially in brighter parts of the image. This is because they contain less information, higher local contrast means small variations of brightness becomes more visible; it usually affects the blue sky. One can try to improve this by applying another plugin - GREYCstoration to the resulting and flattened image.
Tuesday, 24 March 2009
EEE PC as Photo Frame - Slideshow selection dialogue
After your slide show is up and running you may want to add some improvements - the ability to create as many slideshows as you like and choose one as you clicked on the icon.

To make this possible our slideshow script should be able to:
To implement new features, mentioned above, I introduced three variables:

It shows a file manager, which displays my directory tree. The address bar shows my base folder - "/home/user/MMC-SD/partition1/DCIM/", this value is directly assigned to ssPath.
Then I use the command zenity which displays a nice dialog, as shown on the first picture. The result (my choice) is assigned to ssFolder:
The next step is to make sure ssFolder is not empty, so the rest of the script is executed if the below command returned TRUE:
Enjoy!

To make this possible our slideshow script should be able to:
- find slideshows located under some base folder
- display the list where we can choose one from
- pass our choice to the viewer program (qiv)
As you may have noticed I commented the commands related to background music.
#!/bin/sh
ssPath="/home/user/MMC-SD/partition1/DCIM/"
cd $ssPath
ssList=$(ls -dx *)
ssFolder=$(zenity --list --title="Choose Slideshow" --column="Folder" $ssList)
if [ -n "$ssFolder" ] ; then
xset s off -dpms
# mpg321 --random --quiet /home/user/MMC-SD/partition1/MISC/audio/*.mp3 &
qiv -sfmir -d 8 $ssPath$ssFolder/*
# killall mpg321
xset s on +dpms
fi
To implement new features, mentioned above, I introduced three variables:
- ssPath - my base folder, each its sub-folder is a slideshow (you must change its value to your actual location)
- ssList - the list of all found slideshows
- ssFolder - what I chose from ssList

It shows a file manager, which displays my directory tree. The address bar shows my base folder - "/home/user/MMC-SD/partition1/DCIM/", this value is directly assigned to ssPath.
ssPath="/home/user/MMC-SD/partition1/DCIM/"The folder DCIM contains only sub-folders, every one of them is a separate slideshow. The command
ls -dx *lists them in a single row, and this is assigned to ssList:
ssList=$(ls -dx *)
Then I use the command zenity which displays a nice dialog, as shown on the first picture. The result (my choice) is assigned to ssFolder:
ssFolder=$(zenity --list --title="Choose Slideshow" --column="Folder" $ssList)Zenity was installed on my computer by default, so I think it should be same on yours.
The next step is to make sure ssFolder is not empty, so the rest of the script is executed if the below command returned TRUE:
if [ -n "$ssFolder" ] ; thenThe rest is pretty much similar to what I explained in the previous post. The only difference is this command:
qiv -sfmir -d 8 $ssPath$ssFolder/*qiv should play all files in my selected folder ($ssFolder), attached to the full path (the base folder ssPath). You should avoid having non-image files in that folder, or you may try -n option, which tells qiv to filter files by their magic numbers instead of extensions.
Enjoy!
Friday, 20 February 2009
EEE PC as Photo Frame - adding music
It would be nice to add some background music while watching a slideshow (see my previous post about making a slideshow script). After playing with that script I ended up with the following version:
Below is the short explanation of the changes.
I noticed that after 20 minutes the screen went blank, although screen-saver feature was disabled. The command
Using my Package Finder tool I found that my EEE PC had pre-installed command-line audio player, called mpg321. It appeared that this program was quite suitable for our purposes.
When we terminated qiv, playing the slideshow, we also have to stop music. The command
That's all.
#!/bin/shYou should obviously replace "/path/to/music/files/" and "/path/to/picture/files/" to your actual locations.
xset s off -dpms
mpg321 --random --quiet /path/to/music/files/*.mp3 &
qiv -sfmir -d 8 /path/to/picture/files/*.JPG
killall mpg321
xset s on +dpms
Below is the short explanation of the changes.
I noticed that after 20 minutes the screen went blank, although screen-saver feature was disabled. The command
xset qrevealed, that DPMS (Display Power Management Signaling) feature was enabled, so I changed the first command in the script as follows:
xset s off -dpmsto switch DPMS totally off. The last command re-enables this feature.
Using my Package Finder tool I found that my EEE PC had pre-installed command-line audio player, called mpg321. It appeared that this program was quite suitable for our purposes.
mpg321 --random --quiet /path/to/music/files/*.mp3 &The above command launches mpg321 player and tells it to play all mp3 files in the given folder in random order; the --quiet option supresses unnecessary text output. The "&" at the end tells the OS not to wait for the player finished its work, but go to the next line of the script.
When we terminated qiv, playing the slideshow, we also have to stop music. The command
killall mpg321does the trick.
That's all.
Sunday, 15 February 2009
Asus EEE PC 701 as Digital Photo Frame

Its quite easy to turn your EEE PC into digital photo frame. To make this possible one needs two things.
Firstly a program, which would present the photos in a full-screen slideshow mode.
Secondly the screen saver (or rather power saver) feature should be temporarily disabled, to avoid getting black screen after 5 mins of inactivity. Obviously the laptop must be powered from the mains.
After some googling I found the program, which I think fits quite well for slideshow. It's called qiv, Quick Image Viewer. Because EEE PC has a lot of software pre-installed, it worth to see, if this program is already on your computer or not.
1. Open the terminal (Ctrl+Alt+T) and type:
qiv --helpIf you see a lot of output with explanations of possible options and available keys, you can skip the next step, otherwise you have to install it.
2. Type in the terminal:
sudo apt-get install qivThe above command (apt-get) installs the mentioned package (qiv) into your computer, and requires administrative rights to perform this task (sudo).
If the above does not work, see this tutorial about Adding Additional Software Repositories.
Unfortunately I am not sure what repository qiv came from.
Note: If you are in doubt what any terminal command is intended to, say "sudo" as above, type "man sudo", which will show manual pages for the given command; to scroll down use Space
3. Put the pictures, you want to present, in a single folder. You may also wish to scale them down, to save some disk space. In my case the photos were exported (with scaling down to 800 pixels) from Picasa to
/home/user/MMC-SD/partition1/DCIM/Starred-Photos/
As you may guess the above string points to the folder, located on the 1GB SD card, which was earlier used with my digital camera. Now this card is an extra storage for EEE PC.
4. Again, in the terminal type the following (change my folder to the path to your picture location, and keep in mind that Linux commands are case-sensitive):
qiv -sfmir -d 8 /home/user/MMC-SD/partition1/DCIM/Starred-Photos/*.JPGand see, what is going on. Ideally you should get your slideshow working. To terminate it, press ESC
Brief explanation the above command:
- qiv - calls Quick Image Viewer
- -sfmir - is actually five options; -s is for slideshow; -f is for full-screen mode; -m is for preserving images aspect ratio and zooming; -i is to disable status bar, and -r is for random order
- -d 8 - means 8 secs delay between images; you may want to change this value
- space - to get the next picture
- esc - to terminate the slideshow
- s - to pause/continue slideshow.
There is no running screen-saver on EEE PC by default, but there are some low-level power saving options. One of them is an option in xorg.conf file, which tells to set the screen black, if there were no keyboard/mouse activity for 5 mins. To avoid this type the following command:
xset s offand check you can watch your slideshow endlessly. If all the above works, we should now put it all together.
5. Open a text editor, to do it type in the terminal:
kate6. Enter the following set of commands:
#!/bin/shIn the above sample change the third line with your command from step 4. First line says it is the script, second switches blank screen off, third is actually your slideshow and last restores power saving settings.
xset s off
qiv -sfmir -d 8 /path/to/your/pictires/*.JPG
xset s on
7. Click File -> Save As.. and save this file as "slideshow.sh" (without quotes).
8. Close the text editor
9. Type in the terminal:
sudo chmod +x slideshow.sh
The above command makes your "slideshow.sh" file executable.
10. Type:
./slideshow.sh
and check that everything works.
11. Type:
sudo mv slideshow.sh /usr/local/bin/This command moves your file from your home folder to a system folder for executable files, (not supplied by the OS vendor).
12. Type:
cd /usr/local/bin
This will change your current active folder and then type:
sudo chmod +x slideshow.shto make the file executable again.
13. Using Launcher Tools create a new launcher in your favourite folder, like shown in the picture:

That's all!
Enjoy, but avoid using it when the computer is on battery.
TODO: Add some music.
Saturday, 31 January 2009
Asus EEE PC as E-Book reader (option 2)
Browsing through the menu in Full Desktop Mode I noticed the presence of the installed E-Book reader application at
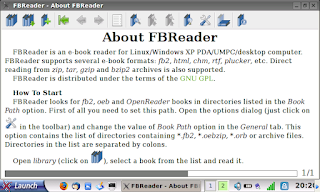
Launch -> Xandros -> Office -> E-book reader
The application called itself FBReader and proved to be quite useful for HTML and plain texts. Surely to get the most of it the program needs to be a little bit customized.
First, add it to the list of programs, available in Easy Mode. To do this I used the tool called Launcher Tools, so the procedure was straight-forward and a new launcher "Book Reader" appeared in my Favorites tab.
The following few simple steps will allow you to make reading books more comfortable.
Click OK or Apply.
That's all.
After the above has done, you can simply scroll pages down and up with RightArrow and LeftArrow keys respectively. You can obviously set some other options, like fonts (Styles tab) and text alignment (Format tab).
Unfortunately, FBReader does not work well for me. The reason is that I read texts in Russian sometimes, which are formatted incorrectly by FBReader - it squeezes some spaces between words to none, so option 1 (see my previous post) is still useful for me. Hopefully once I will find the way to fix this.
Launch -> Xandros -> Office -> E-book reader
The application called itself FBReader and proved to be quite useful for HTML and plain texts. Surely to get the most of it the program needs to be a little bit customized.

First, add it to the list of programs, available in Easy Mode. To do this I used the tool called Launcher Tools, so the procedure was straight-forward and a new launcher "Book Reader" appeared in my Favorites tab.
The following few simple steps will allow you to make reading books more comfortable.
- Launch FBReader and click Preferences button

- Switch to Scrolling tab, select Options for Large Scrolling and choose Scrolling Mode = No Overlapping
- Switch to Margins tab and set your preferred margins, my choice was:
- Left and Right margins = 8
- Top margin = 0
- Bottom margin = 4
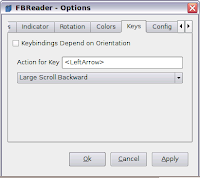
- And now the most important thing: switch to Keys tab
- Click on Action for Key field, press RightArrow
key, located on the right bottom edge of the keyboard, and select Large Scroll Forward action for it - Click on Action for Key field again, press LeftArrow
key and choose Large Scroll Backward action, like this:

Click OK or Apply.
That's all.
After the above has done, you can simply scroll pages down and up with RightArrow and LeftArrow keys respectively. You can obviously set some other options, like fonts (Styles tab) and text alignment (Format tab).
Unfortunately, FBReader does not work well for me. The reason is that I read texts in Russian sometimes, which are formatted incorrectly by FBReader - it squeezes some spaces between words to none, so option 1 (see my previous post) is still useful for me. Hopefully once I will find the way to fix this.
Saturday, 17 January 2009
Using Asus EEE-PC as E-Book reader
Lightweight and compact sub-notebook Asus EEE-PC is an ideal candidate to be used as an e-book reader. This how-to explains the simple steps which will make reading the real pleasure. I did it for my EEE-PC 701 with 800 x 480 screen resolution and Xandros pre-installed, but these recommendations can be easily adapted to any other sub-notebook model.
To convert the notebook into e-book reader we should perform some text changes to fill the whole screen and avoid scrolling. That means the text must be formatted into pages of the same size as your screen.
Let see how this could be done. As the example I will convert the book "All around the Moon" by Jules Verne, found on Project Gutenberg web site (http://www.gutenberg.org/files/16457/16457-h/16457-h.htm)
1. Open the text in your web-browser. The HTML format would be the best option, but with its absence plain text is fine as well (it will make the final file smaller). Detailed steps are as follow:
2. Select the whole text (Ctrl+A) and Copy it into Clipboard (Ctrl+C) (do not close the browser yet).
3. Open OpenOffice Writer and paste (Ctrl+V) the text into empty document.
4. Go to Format -> Page menu and set the new page size. Click Page tab and make the following changes:
Format: User
Width : 40 pi (picas) (it is 6.67 in or 16.9 cm)
Height: 24 pi (it is 4 in or 10.2 cm)
All margins (Left, Top, Right, Bottom): 1 pi (0.17 in or 0.42 cm)
Click OK.
Default Measurement Units can be set at Tools -> Options -> OpenOffice Writer -> General. You may obviously round the values in your preferred units, keeping approximately the same rate as 800 x 480.
5. Go to File -> Export As PDF and save the book in "My Documents/My EBooks" folder or anywhere you like.
6. Open Acrobat Reader, load your book, hide taskbar at the bottom of your screen, then press Ctrl+L to get to the full-screen mode and enjoy.
Some recommendations.
1. Between steps 4 and 5 I would change font for "Body text" style to something, what is easier to read, say DejaVu Serif (the default font can be set at Tools -> Options -> OpenOffice Writer -> Basic Font).
2. I would also suggest replacing heavy Acrobat Reader to Evince, this will free about 200 MB of the disk space.
If you have another laptop with different screen size, you will have to re-calculate your page width and height (step 4) to match your screen.
To convert the notebook into e-book reader we should perform some text changes to fill the whole screen and avoid scrolling. That means the text must be formatted into pages of the same size as your screen.
Let see how this could be done. As the example I will convert the book "All around the Moon" by Jules Verne, found on Project Gutenberg web site (http://www.gutenberg.org/files/16457/16457-h/16457-h.htm)
1. Open the text in your web-browser. The HTML format would be the best option, but with its absence plain text is fine as well (it will make the final file smaller). Detailed steps are as follow:
- assuming that your notebook has already connected to the Internet, click Internet tab
- click Web icon, this will start Firefox Web browser
- copy the above link to your browser's address field or navigate to another book, if you like
2. Select the whole text (Ctrl+A) and Copy it into Clipboard (Ctrl+C) (do not close the browser yet).
3. Open OpenOffice Writer and paste (Ctrl+V) the text into empty document.
- click "Show Desktop" icon on the taskbar or minimize the browser
- switch to Work tab
- click Documents icon, this will launch OpenOffice Writer
- click inside the empty document (the vertical cursos should start blinking) and press Ctrl+V
4. Go to Format -> Page menu and set the new page size. Click Page tab and make the following changes:
Format: User
Width : 40 pi (picas) (it is 6.67 in or 16.9 cm)
Height: 24 pi (it is 4 in or 10.2 cm)
All margins (Left, Top, Right, Bottom): 1 pi (0.17 in or 0.42 cm)
Click OK.
Default Measurement Units can be set at Tools -> Options -> OpenOffice Writer -> General. You may obviously round the values in your preferred units, keeping approximately the same rate as 800 x 480.
5. Go to File -> Export As PDF and save the book in "My Documents/My EBooks" folder or anywhere you like.
6. Open Acrobat Reader, load your book, hide taskbar at the bottom of your screen, then press Ctrl+L to get to the full-screen mode and enjoy.
Some recommendations.
1. Between steps 4 and 5 I would change font for "Body text" style to something, what is easier to read, say DejaVu Serif (the default font can be set at Tools -> Options -> OpenOffice Writer -> Basic Font).
2. I would also suggest replacing heavy Acrobat Reader to Evince, this will free about 200 MB of the disk space.
If you have another laptop with different screen size, you will have to re-calculate your page width and height (step 4) to match your screen.
Subscribe to:
Posts (Atom)
